Showing posts with label make. Show all posts

Tuesday, 2 February 2016

Welcome to the Jungle


The devil makes work for idle hands, apparently. So, y'know, cross stitch. Saving souls since the Middle Ages. There are a lot of cool designs out there via Subversive Cross Stitch and similar, but given the small people I live with, this kind of design is still out for a few years:


A great housewarming gift for childfree couples though, eh?

My version is a cross-stitched QR code - those unique 'fingerprint' designs that marketing departments stick on posters etc in the vain hope that consumers will zap them with a smartphone app and 'engage with further content' from the brand. Anyway, you can make your own for free using a QR code generator, and link it to whatever URL you fancy. If you print the resulting code out on A4 paper and draw a grid over the top, you have an automatic cross stitch pattern. 

I picked the YouTube link to Welcome to the Jungle by Guns n' Roses. 
Not very complicated really, but essential to keep count properly, as any mistake means it won't work and it will be a right arse to work out where you went wrong! 

Being very childishly pleased with myself when it worked, I went on to make one for the kitchen which takes you to this classic line from Withnail and I


It's by the wine rack of course.

Lakota x

Thursday, 22 December 2011

Nearly here...

The mince pies have been made (and eaten. And made again...)

All food should have edible glitter

Nativities have been watched, baby Jesus has been dropped, and one star was particularly squishy.

Boy2 shining [with Tim Minchin's hair]

Presents have been sent from as far away as Australia

Included from Kylie was this fantastic kids' annual
She also sent amazing linens and caramel koalas. Swoon.
[K, I know they were for the boys. They got some, honest guv]

And from stars who are closer to home

Decoration from Miss Tea

A nautical scarf from Kat


I'm not quite Kirstie, but there are a few homemade touches here and there

This was going to be for a child, but I thought better of it.
Note the pocket to maximise present potential

Pasta angel hanging out with the mitten

Gingerbread house

Cereal box and wrapping paper wreath

The cake. 
Jay-Z was delighted with his bling from Hip-hop Santa

We're in Wales as of tomorrow so leaving it all behind. Aside from the presents and a vast Christmas cake. That comes with, balanced on a boy. Maybe the elves will have packed everything away again by the time we get home. I wish you all a very Merry Christmas or a Happy Channukah (both, if you're my in-laws).

Lakota x

PS. Did you see the linky post for the Christmas swap? If you've done a post on your gifts, link up here.

Sunday, 4 December 2011

Scrabble tile wishes, or further adventures with a glue-gun [Christmas Decorations Part 2]

Further to my glue-gunned angelic creations, I had a look through my crafting bits and pieces to see what else I could press into service as tree decorations, and remembered the scrabble tiles left over from my ring making phase.

I've seen similar decorations done on actual scrabble racks, but as I don't have any, and even if I did, couldn't be bothered with using a hack-saw to cut them to size, this - as usual - is my easy version. You could do the names of all your family members, or just choose some Christmas-y words like I did. If I was attempting to sell them as a set in a fancy gift shop, I'd suggest they were 'Christmas Wishes', and that you "concentrate on your festive hopes as you hang them on the tree" or some such nonsense. You can if you want, I haven't made 'Mulberry handbag' or 'Pony' yet though. [I'm out of Ys]

There's a 90% chance of one of these 

I simply hot glued the tiles together at the edges, and added a screw eye left over from the printer's tray earring holder project as a loop to thread the baker's twine through. If you don't have any screw eyes, you could just glue a loop of ribbon to the back. They're a bit flimsy without anything else holding them together, so I cut some scraps of felt to size and glued them to the reverse.

      ^Last week's hot glue burn         
                                                             
Boy1 hung 'PEACE' on the tree and said seriously, "I'm not really wishing for that". I explained that it referred to 'absence of war' rather than the more commonly requested peace and quiet. He decided that was fair enough. What are you hoping for this Christmas?

Lakota x

Linking up to Weekend Wonders

Thursday, 1 December 2011

Holy Macaroni Batman! It's almost Christmas! [Decorations Part 1]


When the good folks at 'The Pasta People' got in touch with me and asked if I'd like to get hot glue burns and gold paint all over the kitchen floor whilst crafting, then eat a hearty dinner afterwards, I could hardly wait to get to get started! Oh no, hang on, that's how tedious sponsored posts open. I was confused there for a minute. *ahem*

I did however promise a craft post involving macaroni, which I feel is justified as the festive countdown has officially started, and nothing says 'Christmas' like carbs and swearing. Given my six years of servitude as 'craft lady' at a playgroup, and possession of two small boys, you might think I'd have had enough of offerings made from uncooked Italian food. But you'd be wrong! It's so versatile! All of us with kids have at some time worn something like this, right?


And who wouldn't want to keep their pencils in one of these?

That's right Grandma, start practising your happy face


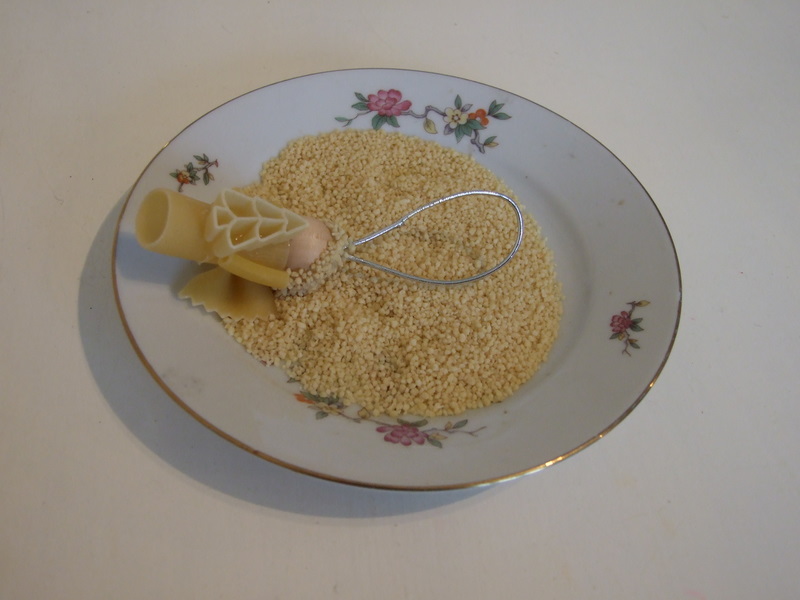
But pasta angels are another thing entirely. I obviously had a sheltered childhood, as the first time I came across this idea was a couple of years ago in Croatia, where I met a guy selling them to tourists. Being a sucker for a Christmas decoration, I bought one, and then thought - I could make those! Since making mine I've discovered them touted on the internet as a craft for kids - but frankly I'm not letting my offspring near the glue gun. Cub scouts are obviously hardier in the States, what with all that hiking in bear infested woods that they do. But I genuinely think they look quite cute on the tree, belying their pre-school materials. [Pasta angels that is, not cub scouts]

You can do 'classy' versions, painted white with a suitably angelic face drawn on afterwards, but I think we can all agree that pasta and gold go together like Donatella Versace and, er, gold. See?

Look, you can hardly tell the difference


Ok, so to make my version you need:
- wooden beads, 3/4 inch diameter
- pasta tubes for the bodies - I used Millerighe   
- Farfalle pasta aka 'bowties' for the wings
- macaroni, for the arms
- Christmas shaped novelty pasta (optional)
- cous-cous
- gold elastic thread, or similar
- hot glue gun (or other strong glue)
- gold paint and brush


1. Thread a loop of elastic through your bead and secure with a knot


2. Put glue around the base of the bead and attach to the millerighe pasta tube


3. Choose some slightly curved macaroni for the arms, and attach a farfalle to the back. I think it looks best if you set the arms at an angle, so the hole at the top is hidden by the wings. My photos in progress have the arms at the wrong angle.


4. Choose a novelty shape for the angel to be holding - I like trees and presents. The candlestick looked a little indecent. If you can't find Christmas pasta then you can always make a little 'hymn book' or similar out of card.


5. Cover the back and sides of the head in glue, and roll in cous-cous to make hair. Again, I've seen these online using tiny individual rolls of pasta, which gives a hairstyle somewhere between Marilyn Monroe and Hilda Ogden. Also this is extremely time consuming and if you're anything like me will result in you burning yourself with hot glue. [I have a blistered thumb]


6. Let the glue dry. Then paint. I only had gold and silver paint designed for railings and garage doors and the like - it would probably be easier and less drippy to use spray paint, which I will try if I make any more.


Ta-dah!

A decoration to treasure! 

Never let it be said there's no room on my tree for a bit of kitsch. How about yours? 

Lakota x

Linking up to Handmade Thursday

Monday, 7 November 2011

Printer's Tray to Earring Display

Hello. Sorry I've been a bit quiet for the last week, it's been a busy one. I'll catch up with all your blogs soon. Incidentally, yesterday's Silent Sunday post was my 100th - I'm amazed I've made it this far. Thank you to  everyone whose comments and feedback have made it so much fun.

Anyhow - remember the printer's tray (or type case) I bought recently? It's far better made than a lot I've seen, with dovetail joints and a solid wood back rather than plywood, but it had several years' worth of filth and dead spiders which needed removing before I could do anything else with it. It was a harder task than I'd anticipated cleaning each little compartment - 95 of the grimy things in all. Dust and dessicated arachnids removed, I gave it a light sanding and then applied a couple of coats of Danish Oil with a paintbrush. The colour came up beautifully.

Mr FHCS manfully took on the task of attaching two 'screw eyes' (closed loops) to each compartment save the tiniest ones; not an easy job. We discovered the best way was to part hammer in a thin tack to make the initial hole, then get the screw eyes in place by holding and twisting them using needle nose pliers. Strangely he's not thrilled at the idea of making any more and going into business on Etsy, muttering darkly under his breath about callouses and where was his tea? A couple of decades later, I screwed some fittings to the back and it's ready to be hung on the wall.

Here's the finished article, with a selection of my finest earrings hanging happily from it. I had thought about backing some of the compartments with vintage map paper, but I'm not sure it needs it. Another option would be to back a few compartments at random with mirror cut to size - I've seen this done and it adds definite glamour, but it might look better against darker wood?


I've put in one pair per compartment, but you could easily fit one pair per loop in most cases.


And here's a reminder of what it looked like before - pretty good transformation don't you think?


I'm really quite in love with it now, and it's my Flea Market Find of the Year. Anyone want to come over and play jewellery shop?

Lakota x

Linking up to

                     Be Inspired @ Elizabeth & Co
                     Sophie's Flea Market Finds
                     Magpie Monday
                     Nifty Thrifty Tuesday
                     Thriftaholics Weekly